E7 | Nashville Brick Cottage | Shelter from the Storm
Season 46 Episode 7 | 23m 42sVideo has Closed Captions
A safe room is constructed in the basement to provide shelter from tornadoes.
Pressure is on at the Nashville house to finish on time. Zack Dettmore flies in to help builder Javier Gutierrez install a composite deck. Jenn Nawada meets homeowner Rachel and landscape designer Max Finkbeiner to discuss plans for the front yard. Kevin O'Connor meets with TEMA director Patrick Sheehan for tornado safety tips. Homeowner Adam and builder Lyn Bowman go over safe room plans.
Problems playing video? | Closed Captioning Feedback
Problems playing video? | Closed Captioning Feedback
Funding for THIS OLD HOUSE is provided by The Home Depot and Renewal By Andersen.
Support provided by:

E7 | Nashville Brick Cottage | Shelter from the Storm
Season 46 Episode 7 | 23m 42sVideo has Closed Captions
Pressure is on at the Nashville house to finish on time. Zack Dettmore flies in to help builder Javier Gutierrez install a composite deck. Jenn Nawada meets homeowner Rachel and landscape designer Max Finkbeiner to discuss plans for the front yard. Kevin O'Connor meets with TEMA director Patrick Sheehan for tornado safety tips. Homeowner Adam and builder Lyn Bowman go over safe room plans.
Problems playing video? | Closed Captioning Feedback
How to Watch This Old House
This Old House is available to stream on pbs.org and the free PBS App, available on iPhone, Apple TV, Android TV, Android smartphones, Amazon Fire TV, Amazon Fire Tablet, Roku, Samsung Smart TV, and Vizio.
Keep Exploring


This Old House Insider Newsletter
Get This Old House exclusive stories, tips, and behind-the-scenes information delivered right to your inbox every month.Providing Support for PBS.org
Learn Moreabout PBS online sponsorshipKevin: Today on "This Old House," we are going to install a new composite deck with the help from a familiar face.
Jenn: I'm here at a local landscape design build garden center that's helped Rachel bring the vision for her front yard to life.
Kevin: And we're creating shelter from the storms by building a residential safe room.
♪♪ Man: Ahh.
That's it.
♪♪ ♪♪ ♪♪ Kevin: Hey, there.
I'm Kevin O'Connor.
Welcome back to "This Old House" and our project here in Nashville, Tennessee, one of the fastest growing cities in the U.S. Nashville has grown a staggering 81% over the last three decades or so.
And like so many of the city's residents, our homeowners are transplants who came here for the quality of life and the culture that this city provides.
Now, they're also working on this beautiful gem right here, renovating it for themselves and their two children.
And they are here to stay.
So the project is entering the final stages.
Let me show you some of the progress that we've made.
Out front, the colors have been chosen.
So we've got a dark gray for the trim and then a lighter gray for the siding, which is pretty much just this corner of the house.
We've got a new poured concrete walkway here in front, and as you can see, still quite a bit of work to do on the landscaping out front as well as out back.
But don't worry.
Jenn and our homeowner Rachel are working on a plan for that.
The concrete continues up to two new steps to a new concrete stoop, which will lead you right inside.
To come through the front door, it drops you into the living room center of the house.
A pretty generous room right here.
Over on this wall, we had the existing fireplace, which we were pretty much going to leave as is with some updates to the wood trim, but we found some structural issues as they got to work.
So now the mason is rebuilding all of this.
So as I say, a generous room right here and on the opposite wall of the brick, this is going to be the music room in here.
This opening is going to have these doors.
They were there.
They were painted.
Our homeowners are stripping them.
They're going to go with a natural wood look, rehang them and try to isolate some of the sound from the music room and the rest of the house.
Looks like they are thinking about some paint colors on the interior -- gray -- and keeping with that same style outside.
As you walk through here, big, wide-open space and a new kitchen.
And I don't know if you remember how small and cramped that old kitchen was, but this is a big improvement.
Starts with a center island right here.
There'll be a piece of stone that overhangs and to support it, two legs.
These are actually the old cedar posts from the basement.
And Tommy and Adam laid hands on these to make them tapered.
There'll be two of those to support that piece of stone right there.
The layout is a refrigerator right here, flanked by black oak cabinets.
And then behind the guys who are templating for the stone, we're going to have the stove there, obviously the hood and the sink right here in the island.
And then these wrap around, more counter space.
You can see here these are shallow-depth cabinets.
They're going to be left open.
And what's nice about this is going to allow you to get close to operate this pop-up window, which is a really nice feature to the outside.
The stone is going to be soapstone on the island, the counters, and also a piece that runs up the wall behind the stove right there.
For everything else, they've actually chosen wallpaper.
And so that's going to go here.
But there is a lot of tile in this house, two full bathrooms upstairs.
Those have all been waterproofed.
The tile has been laid down on the floors and the walls.
It is grouted and that is done.
The space is wide open to the backyard through double sliders right here out to a back deck.
Javi, how are you?
Javier: Kevin, good, and you?
Kevin: I'm doing very well.
Oh, Zack, look at you.
Zack: Hey, Kevin.
Kevin: Welcome to Nashville.
I knew you were coming down.
I didn't think you'd get here this early.
And you obviously started throwing in.
You got a helper.
Javier: Excellente.
Kevin: You've also got a guy with the know, right?
Because we're using something you used in Jersey.
Zack: Yeah.
We're going to use this same porch flooring that we used on the last project.
Basically a solid PVC.
They're never going to rot out and need to be replaced.
When you look up from the bottom of this, it'll look nice and consistent, and there won't be any debris that falls through.
Kevin: Because it's tongue and groove.
Zack: Exactly.
Yeah.
Kevin: Okay.
So have you got a plan for installation?
Javier: Yes, sir.
Kevin: What are you doing?
Javier: Let me show you.
Kevin: I see you guys got some cut boards already rough laid down here.
You're running from the house out.
Tommy's going to be proud.
You're not going to have to listen to the old man yell at you.
Javier: One of the reasons that we're doing it, obviously, the house is pretty old, and we might have different measurements, so we're going to cut them all the same length.
Pop a straight line from left to right, come back, cut it with a straight edge, and we're going to use this 1x6.
Kevin: Oh.
Javier: For the picture frame.
Kevin: You're going to do a picture frame?
So let me see if I got this.
You're going to put this basically out there.
Javier: That's correct.
Kevin: And then all of these are going to terminate right into that.
Javier: Yes, sir.
Kevin: Very nice.
So that'll be outside edge and then returns on the sides?
Javier: That is correct.
Kevin: Miter 45?
Javier: Correct.
And then we also have a 5/8 drop from front to back.
That way if water ever came this way, we have -- Kevin: Shuts it off.
Javier: Shuts it right off.
Kevin: Alright.
Well, what can I do to help?
Javier: You can start cutting some boards for us.
Zack: We're going to start by using one of these screws that actually comes with a plug.
Because we can't hide a fastener in the tongue on this edge.
And you can see on the tip of the gun, it's got a little felt piece that allows you to set the screw to the perfect depth to receive the plug.
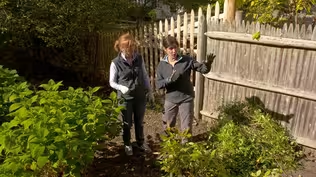
♪♪ ♪♪ Jenn: I'm here at a local landscape design build garden center that's helped Rachel bring the vision for her front yard to life.
So let's see what they have and finalize the plan.
Rachel: Wow.
Jenn: Hey, Rachel.
Rachel: Hey, Jenn.
Jenn, this is our landscape designer, Max.
Jenn: Max.
Max: Hi, Jenn.
Nice to meet you.
Jenn: Nice to meet you.
You have a very beautiful nursery here.
Max: Thank you.
We're right downtown Nashville.
And we're just here going over the plans for Rachel so we can get an idea of what we're going to be doing at their home.
So, one of the most important things that we were trying to incorporate here for Rachel and Adam was this is a really vibrant neighborhood.
Lots of people walking down the sidewalk down the street, and they wanted to make sure that they had a space where they could feel comfortable sitting out front, interacting with their neighbors and being a part of the community.
Jenn: Fantastic.
Max: So we created a little sitting area here.
They could have some space there just to hang out and relax.
And we've created a little evergreen hedge here that they can kind of tuck behind and see.
Jenn: Yeah, it's a little bit of privacy.
You can slouch down in your chair, but then also just interact with your neighbors.
Max: That's right.
Jenn: And I love that you're repeating the same idea with the same plants.
So it gives that continuity.
Max: And then we added some ornamental grasses here.
You know, the wind blows through those.
You hear them.
Jenn: You're evoking all the senses.
I love this.
Max: We're trying, you know, and we've repeated that ornamental grass.
And then we've got a shade tree here out front.
That'll all create a nice space for them to enjoy throughout the summer heat.
So we've got a great jumping-off point here.
I'd love to see you guys walk around the nursery, make some final decisions for all these different plants.
Jenn: Yeah, it's different seeing them in person than a circle on a piece of paper.
Max: Yeah.
Enjoy your time here.
Jenn: Let's go.
Rachel: Thank you, Max.
Jenn: Yeah.
This is great.
Thank you.
Appreciate it.
Okay.
Wait.
These are on your plan.
Let me show you.
Here's the clethra right here in the foundation.
And then this is where the azalea is.
So this is going to bloom for you in the spring.
It's a beautiful pink azalea.
It has a nice structure.
It'll stay tight like this, but I'll still get about this big by that wide.
Rachel: Okay.
Jenn: Okay?
And then this one, the clethra, otherwise known as summersweet.
It has a very fragrant flower.
They either come in white or pink.
Rachel: I like these two a lot.
I want to stick with them.
Jenn: Check.
Rachel: Yep.
Jenn: Love it.
Alright, so for some more foundation plantings, the evergreen that's on the right-hand side right here in this corner.
Rachel: Mm-hmm.
Jenn: It's a Taylor juniper.
So this is the Taylor juniper that's there.
It's a great plant but for your space and then with the kids touching, it's a little bit prickly.
So I think that this juniper right here is a beautiful one.
It's called a Spartan juniper.
It's just like softer texture, that darker green.
And this one's going to stay a little bit shorter.
And if you wanted to decorate it, it'd be fun.
Rachel: One of my goals is to decorate it like a Christmas tree.
So I think this is kind of the right shape for that.
Jenn: Great.
Maybe we call out to switch it.
Rachel: Yeah.
Jenn: Okay.
Rachel: Let's do it.
Jenn: Fantastic.
Alright.
So, these are some of the perennials that are specked on the plan.
Right here we have the grasses that line the walkway and he repeats one over here.
So this is called a panicum grass, switchgrass.
It's about four feet tall with a plume at the top.
It'll sway in the breeze.
It's a native grass as well.
Do you like that one?
Rachel: I do.
Jenn: Alright.
I think that'll work well.
And then also in the front foundation, we have salvia.
It's a great plant.
It blooms twice a season.
You deadhead them, other little babies start to bloom.
So yeah, you could keep the color going throughout the season.
Rachel: I love purple, so.
Jenn: I know you love purple.
So there's a couple other plants I want to show you.
So this is lavender.
I mean, hello, aromatic walkway.
So I was thinking we could add a few of these to the salvia.
So maybe one of these on either end to anchor salvia in the middle.
And then this one is called catmint or nepeta.
I think you just need one on either side as well because this gets pretty wide.
Again, the more you deadhead it, the more it'll bloom.
Rachel: I love the plan.
I like the tweaks we've made and I can't wait to see it come to life.
Jenn: I know.
It's going to be gorgeous.
♪♪ Kevin: Have you ever noticed that there are very few mature trees on this street?
Well, that's for a reason.
Four years ago, a tornado touched down in this neighborhood and ripped the path right down this street.
It did some pretty significant damage to the neighbors' homes.
And fortunately, on ours, just a little bit of roof damage other than taking down all of the trees.
Now, our homeowners, with two small children, obviously want to keep their family safe.
So the plans for this renovation include a safe room in the basement.
The plans for that have changed a little bit over the last few months, and I'll tell you about that in a minute.
But first, earlier, I had a chance to talk to the head of the Tennessee Emergency Management Agency to learn what homeowners can do to keep them safe from tornadoes.
So, Patrick, I've been doing some research.
I've been looking into the data.
And I saw that last year alone, 40 tornadoes touching down in Tennessee, according to the National Weather Service, and half in the central part where we are right now.
A lot, a little, a trend that's happening?
Like, how do you interpret that?
Patrick: We're certainly seeing a trend where it's increasing, the number of tornadoes that we're having.
I think that's about right for Tennessee right now.
And, you know, we're certainly -- some of that's an artifice of increased reporting.
But no doubt empirically, we can observe we have an increase in the amount of severe weather we're having, including tornadoes.
Most of them, thankfully, are weak, right?
So EF0, EF1, in the woods somewhere.
But, you know, we still have them where they're hitting neighborhoods and businesses and homes.
Kevin: How much warning do people have?
Patrick: The National Weather Service does a great job of giving people a heads-up about watches, which is, hey, the conditions are right for tornadic activity, for tornado damage.
And, you know, in a warning that's happening when you see a hook echo on a radar or someone on the ground observes one and reports to the National Weather Service.
And so they'll generate a warning and, you know, that comes across on our TV and a radio through the Integrated Public Alert and Warning system.
You can have seconds or minutes.
And so that's why it's so important when you do get a tornado warning for wherever you're standing that you act on it.
Kevin: Seconds or minutes is not a lot of time.
Patrick: It's not.
Kevin: I mean, we have hurricanes where we are and we see them coming for days, and it's kind of a slow-moving disaster.
But seconds or minutes, that's terrifying.
Patrick: Yeah.
Kevin: What are people doing when that happens?
Patrick: When you see the watches, and what my family and I do is we go and set up our lowest level interior windowless room so that we can hunker down in the storm, so bike helmets, gloves, boots, a blanket, cellphone charger, and flashlights, prepping that space ahead of time so that when you do get a warning, you can just go and occupy it, and you're not wasting time trying to gather things that you wish you had when you're in there.
Kevin: So when you prepare, you said bike helmets, gloves, boots, flashlights.
Walk me through the thought process of those types of things that you're putting in there with your family.
Patrick: Anything to help add layers of protection.
You know, we know now that wearing a bike helmet, anything, that margin of protection just really helps a lot.
For the boots and gloves is if, you know, you're unfortunate enough that your structure, your home is damaged, then you're not putting yourself at further risk as you emerge from your safe space, you know, and potentially a broken glass or nails or splinters or other things that you might have to worry about.
So just increases the safety.
And then a flashlight because chances are the power is going to go out.
And a cellphone charger just because your cellphone is another method for you to get warnings.
So I would encourage people too to have multiple ways to get warning.
A NOAA-certified weather radio is an important thing to have in your toolkit to make sure you can get warnings if cellphone towers or phone lines are damaged.
Kevin: Your role as the head of the Tennessee Emergency Management Agency is what?
What are you doing?
Patrick: We're trying to make sure that people are prepared and not scared, but that they know what actions they can take and are given sufficient time and warning to act on them.
Kevin: We appreciate that and we appreciate what you do.
Thanks, Patrick.
Appreciate it.
Patrick: Thanks so much.
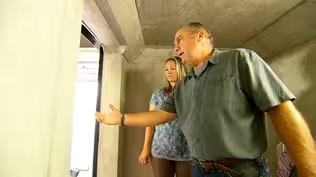
♪♪ Kevin: Hey, Adam, Lyn, how are you guys?
Lyn: Hi, Kevin.
How are you?
Kevin: Wow.
Some nice progress made on this thing here.
So, Adam, can you help us out with the change in plan here?
What happened?
Because originally, the safe room was this whole big room.
Adam: The plan originally was to take up all four concrete walls and build the safe-room lid on top of that.
But when we were figuring out how to construct it, we came up with a couple of problems that we had to work around.
No matter what kind of safe-room lid we were going to use, you need to access it from the top to be able to get it down into the structure.
And if we go all the way to the ceiling, there's no room to get to it.
Kevin: Yes.
Adam: Another problem was the existing HVAC system that both services this room and the office above it.
This was -- Building the room all the way to the ceiling was going to affect how that happens.
So we came up with this solution, basically a room within a room.
Kevin: Alright.
Happens a lot in renovations.
Change of plans midway.
Alright.
So that's the room in the room.
What is going on with this?
Can you walk me through the materials?
What is that?
Lyn: Absolutely.
This is 14-gauge stainless-steel panels.
Kevin: Okay.
Lyn: These are recommended in the FEMA drawings as the first layer on your walls and your roof.
Kevin: And what do we love about this?
Lyn: We love about this because it has a 90,000-pound tensile strength and a 40,000-pound yield strength.
So it's perfect to clad the wall with and the roof with to prevent anything from penetrating.
Kevin: Oh, okay.
So I'm seeing a sandwich there, or I'm seeing a layer of steel and then two layers of sheathing?
Lyn: That's right.
Two layers of 3/4 inch and each one screwed independently to the one below it.
Kevin: That's the lid.
Lyn: Mm-hmm.
Kevin: So this is part of the process of making this room within the room as strong as four concrete walls.
Lyn: Exactly.
We referenced the FEMA website, which had drawings for different applications that you could use, whether it be concrete, block, or wood.
And we have a hybrid of all of those three things.
So our challenge here was to build the lid and this wall to FEMA standards, which we have been doing.
Kevin: So they spec the wall?
Lyn: Correct, yes.
It's like conventional construction but a little bit different.
We have double-bottom plates, we have double studs.
And instead of 16 inches on center, we've got everything at 12 inches on center, double-top plate and double-ceiling joist.
Kevin: So a boatload of lumber and then obviously fasteners that you've got.
Lyn: Yeah, there's about a half a dozen fasteners that we use.
We've got some samples over here if you'd like to check them out.
They look like a lot of fasteners people might be familiar with, but they're not easily or readily available at your local hardware store.
We source these from a distributor that specializes in these.
Kevin: We've done sort of continuous load path before.
I'm looking at it right there.
The bolt ties your frame into the concrete floor.
Lyn: That's right.
Kevin: This beautiful thing right here is doing what?
Lyn: That is tying our lid to our wall studs.
Kevin: Okay.
So what have you specced for the new doors?
Are they going to be similar to what you'd expect for the door out here?
Lyn: Yes, sir.
We'll have the same steel door and frame and we'll put it in this hole and we'll wrap this wall with it.
Kevin: Beautiful.
Will the metal be the exterior sheathing?
Lyn: No, we have another layer of three-quarter to go here, and then another layer of three-quarter to go here.
Everything's screwed six inches on center.
And then finally we have a third layer that goes on the inside of.
Kevin: Love it.
Lyn: We have it already installed in the lid, but we haven't put it on the inside.
Kevin: Okay, change of plans, but how do you feel about the room within a room safe house?
Adam: Feel good.
Feel good.
Kevin: Yeah?
Adam: I think it's going to work.
Kevin: Alright.
Adam: Hopefully we never have to use it.
But if we do, it's here.
Kevin: Alright.
Very good.
I'll let you get back to work.
Thank, y'all.
Lyn: Thank you.
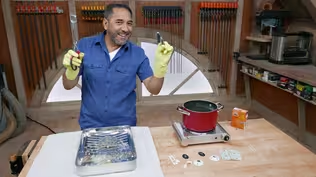
♪♪ Kevin: As our project starts to wind down, most of our doors are hung, and while they are all new, the hinges are not.
These are about 100 years old and we had a bunch on site to reuse, but we also had to source them, so who better to find them for us then our resident treasure hunter Tommy Silva, and our local expert and homeowner, Adam?
Tom: Oh, this is nice.
They got some hardware here.
Adam: This place is cool, right?
Tom: Yeah.
Adam: This is kind of the spot in town if you're looking for any sort of antique hardware, lighting.
Tom: Yeah, it's a salvage yard, basically, which is great, because why throw it away?
Adam: Exactly.
And I need some of these hinges and some of these back blades.
Tom: So these are off your doors.
Adam: These are off of our house, yeah.
Tom: It's a nice solid brass.
Nice thick hinge.
And you could buy these new today but they're very expensive.
And escutcheon plate too?
Adam: Mm-hmm.
Tom: Wow.
Adam: Get a few more of those.
Tom: That might be a little harder to buy new.
[ Laughs ] Adam: Yeah.
Tom: Before we start looking for your hardware, I'd love to take a look around and see what they got in the building.
Adam: Let's do it.
Tom: Okay.
What's nice about coming to a place like this if you're looking for an old door in your house, you got a room you're renovating, or if somebody broke a door, you'd come here and probably find the one you want.
And look.
They got the old bifold doors or room dividers is what they were used for also.
Keep different temperatures so you're not heating the whole house.
And they look great too.
Adam: What is this?
Tom: That actually a window crank for an awning window.
Adam: Oh!
Tom: Ooh, ooh, look at this thing.
[ Both laugh ] You get this, you might have to make the stairway wider.
Adam: I know, right?
Tom: Well, that's for a sliding door.
Your door's hanging here.
Runs back and forth onto a track.
Adam: Very cool.
Tom: Look at this pedestal sink.
Look how low it is.
It's perfect for me, though.
[ Both laugh ] Adam: What's going on with this door?
Tom: Oh, Gothic door.
It looks like they got the whole entryway to it.
Oh, do you know what this is?
Adam: New freezy?
Is it an ice cream maker?
Tom: I bet it is.
Okay.
Adam: Alright, Tommy, I hope we can find our hinges here.
Tom: Oh, I would imagine you could find quite a selection.
So, what are we looking for?
Adam: We're looking for a 3 1/2" ball and hinge.
Tom: Hinge or we call -- also call them butts.
Adam: okay.
Tom: And that's a hinge pin.
One is a dead pin and one is the real pin.
So you can actually reverse this if you wanted to on the door and the doors swing in a different direction.
Or you could take the hinge out and turn it upside down.
So we're looking for that.
Alright.
So they have all different patterns.
Lookit, here's a smaller hinge because these comes in all different sizes and different details on your hinge pin.
Now look at this one.
This is chrome.
You usually see chrome in a bathroom.
You're looking for the solid brass.
Adam: Hey, Tommy.
Tom: Yeah?
Adam: We might have some winners.
Tom: I think you do.
Adam: Pretty messy.
Are these going to be able to get cleaned up?
Tom: There's all different ways you can clean them.
You can use chemicals.
You could scrape them with wire wheels.
You can burn it off.
But it's very important that you realize these old hinges probably have some lead paint on them.
So you want to make sure you cover your hands and wear a good respirator when you're doing them.
But once you get them cleaned up, it'll be just as good as new.
Adam: Alright.
Let's do it.
Tom: Okay.
Adam: Alright.
Hey, Brandy.
Brandy: Hey.
I think we got four winners on hinges.
Brandy: Okay.
Adam: And then the last thing, I'm hoping you have some back plates like that.
Brandy: I definitely have some options for you, so let me grab them real quick.
Tom: Mm.
Yeah.
We also call these escutcheon plates.
They really dress up the hardware nicely.
Ooh, look at this.
Brandy: I think we have a chance.
So, I've got a couple here that these are all going to be in the same kind of size range as the one that you brought in.
They're all going to date from the, you know, early 1900s.
This one here I thought was a good match size-wise and almost color-wise.
But it is missing its little keyhole there.
Tom: Mm-hmm.
Brandy: And then I've got this one here that color-wise is almost a perfect match.
Tom: Ooh, look at that.
Adam: Look at that.
That is a match.
Tom: That is.
I think our work here is done.
Adam: I believe it is.
Brandy: Alright.
I'll ring you guys up.
Adam: Thank you so much.
Brandy: Yeah.
Tom: Great.
Zack: Alright, Javier, so the next step is we got to cut all these field boards back.
We need to snap a line.
And I figured we could put a guide to run our saw along inside and make a straight cut all the way down.
[ Saw buzzing ] Kevin: Hey, look at you guys.
Wow, this looks terrific, huh?
Javier: It does.
Kevin: Nice hot work.
So, nice straight cut right there.
You just got the picture frame to go down?
Javier: Yes, sir.
Look, this is the 1x6 that we talked about.
Kevin: Okay.
Javier: So now that we got that straight line cut, it's gonna slide right here tight to this cut and it's going to stick out an inch and a half just like we talked about.
Kevin: Why the inch and a half overlap from the roof framing?
Javier: Three-quarters inch of our fascia board and then three-quarter inch of just regular overhang.
Kevin: Love it.
Nice.
Okay.
Well, like I said, looks good.
Zack, thank you for coming down to hot Nashville.
Really appreciate you helping out.
Zack: I had a great day.
It was great learning things from Javier.
You got a really good contractor here.
Javier: Thank you, Zack.
Appreciate it.
Kevin: Well, we'll bring him back.
Alright.
Javi, just one week left.
What have we got left?
Javier: We got a little bit of countertops, paint, trim, landscape.
Kevin: Just that?
Javier: Just that.
Kevin: Alright.
All of that for our final episode.
So until then, I'm Kevin O'Connor.
Javier: Javier Gutierrez.
Zack: And Zack Dettmore.
Kevin: For all of us here in sweltering Nashville, Tennessee.
Say it again.
Give it to me again.
Javier: Javier Gutierrez.
Kevin: Oh!
I love it.
[ Laughter ] What's that, Dettmore?
What do you got for me?
Zack: I got Dettmore.
Kevin: [ Scoffs ] [ Laughter ] Kevin: Next time on "This Old House," when we arrived in East Nashville, Tennessee, the renovation of this 1920s cottage kicked off in a dramatic way.
Man: Go ahead.
♪♪ Kevin: After nine months, it's finally time to reveal this updated family home filled with Southern charm and to bid farewell to a city that has welcomed us with open arms.
Jenn: Cheers, y'all.
Tom: Cheers.
[ Laughter ]


Support for PBS provided by:
Funding for THIS OLD HOUSE is provided by The Home Depot and Renewal By Andersen.